Disclaimer and Note
I’m one of the developers of Copado Robotic Testing. This post is a personal opinionated guide to get you started with Copado Robotic Testing, or more specifically, how I use it. These are not official Copado guidelines. Those can be found on the Copado Documentation website. The post has been peer reviewed and we’ve tried to keep this guide as objective as possible.
As of February 2026, there is no self provisioning or sign up for Copado Robotic Testing (CRT). You need to contact Copado to get access a Free Trial.
For those of you who do have access to CRT, this guide will show you how to get started quickly.
Introduction
CRT is a Cloud-based Testing Platform that allows you to create, run and manage your tests in a highly customizable way. There is also an On-Premises version available, but let’s keep that for another post. CRT is available in four regions: Europe, North America, Singapore and Australia.
We are going to use the European region, as that’s where I have my projects. This post is more of a developer focused workflow for testing. Ideally you would want to use a git repository for storing your test code, but we will start with the local file system provided by CRT. I shall cover the CRT + GitHub workflow in a separate post.
Step 0: Create a new Project
In most cases, you will have a Project already created for you, but if not, then you can create one.
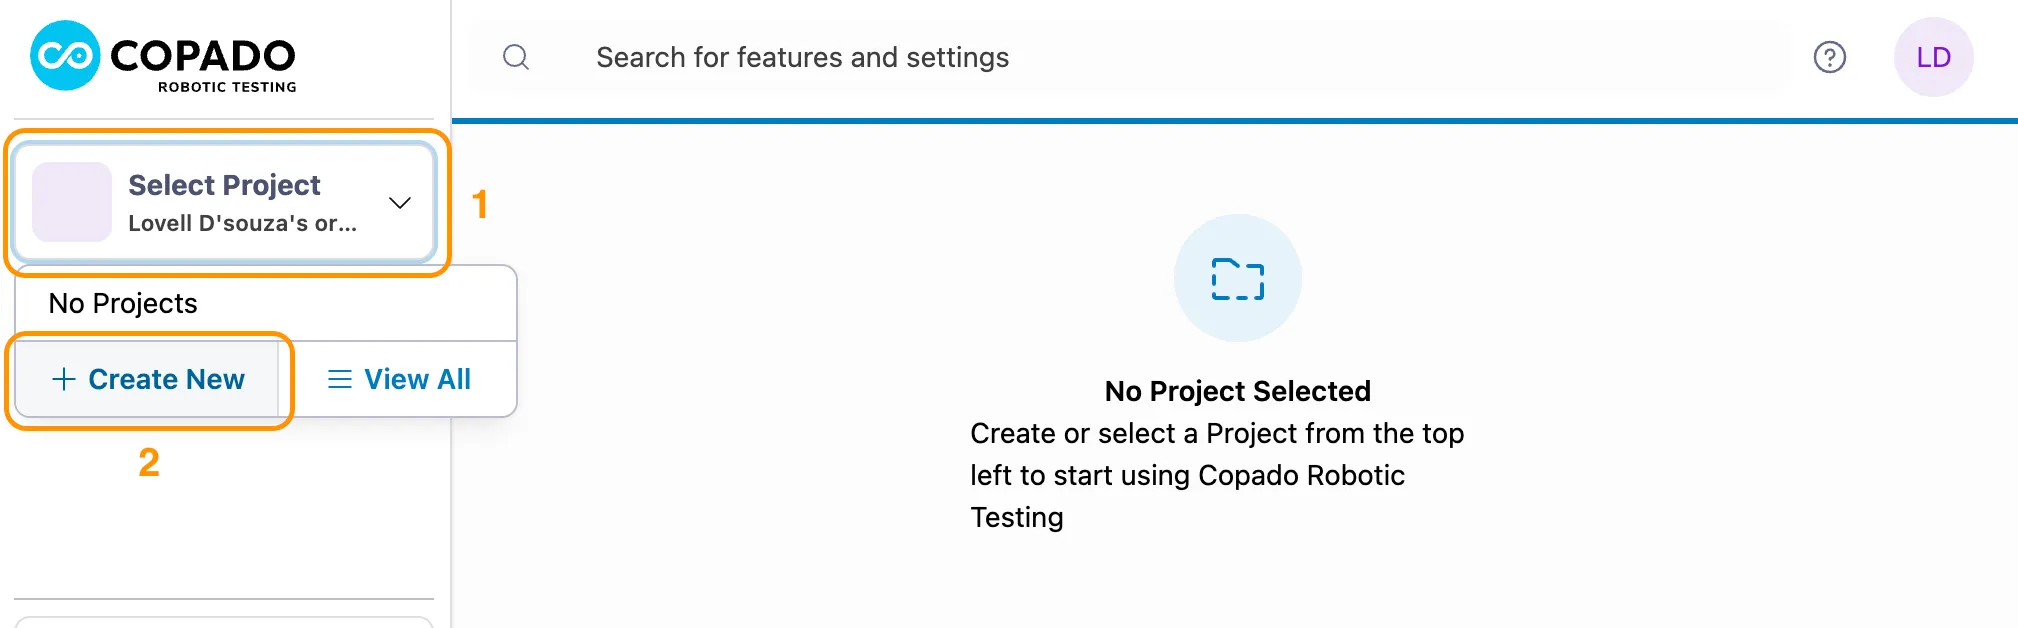
- Create a new Project
- Click on Select Project dropdown.
- Click on Create New button.
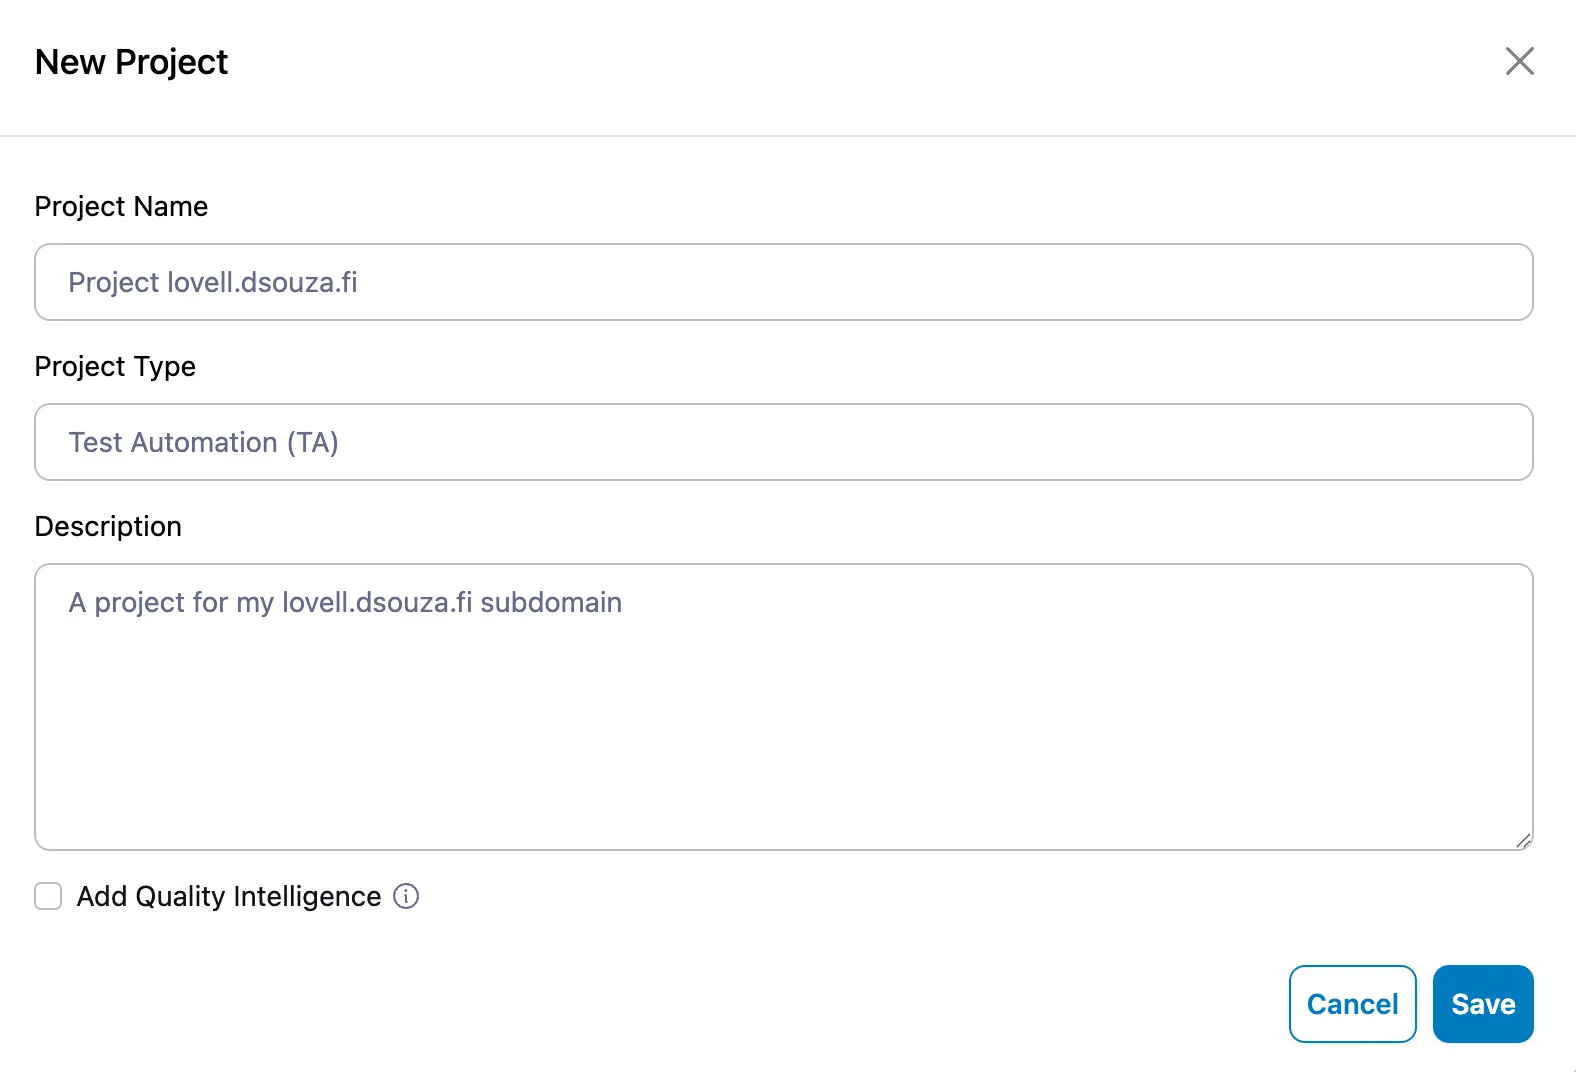
- Fill in your Project Details
- Project Name: The name of your project.
- Project Type: Select Test Automation (TA).
- Description: A short description of your project.
- Click Save.
Once done, you should see the not-so-empty project dashboard view, which is also the homepage. The initial project creation also creates a Default Robot.
Step 1: Create a new test job
Let’s start from scratch, so that we understand how things are configured in CRT.
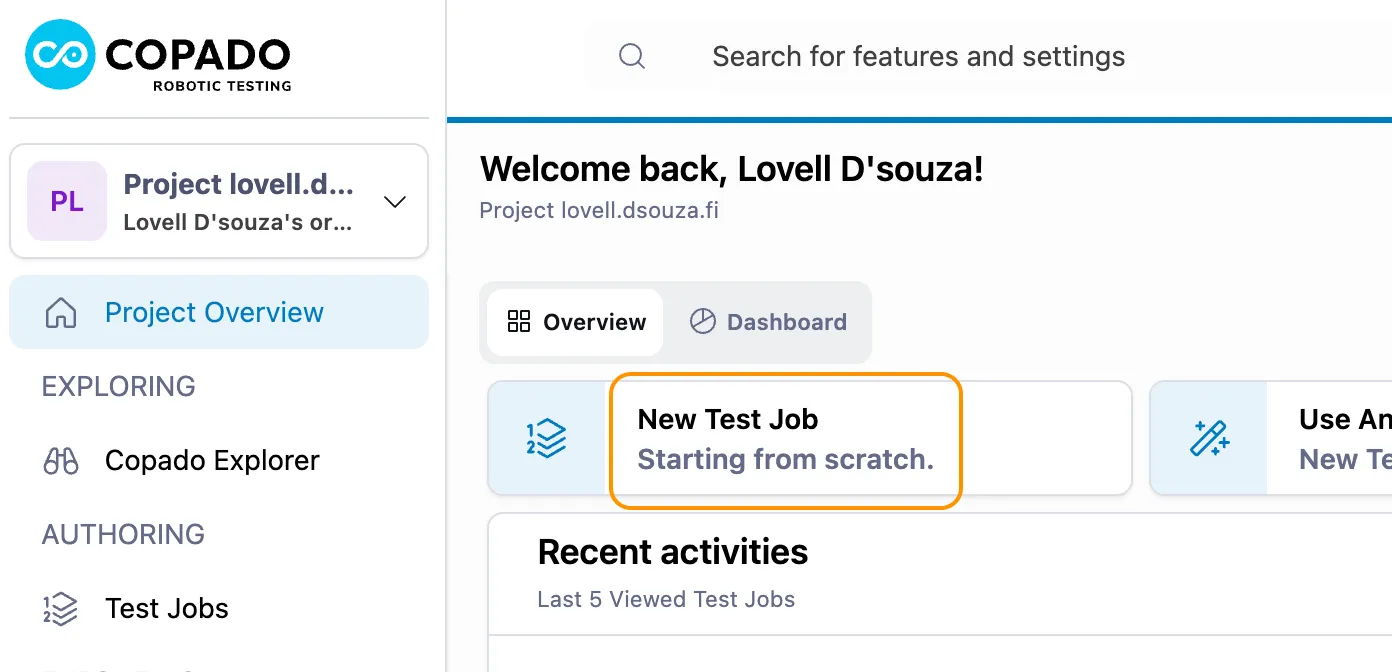
- Click on the New Test Job button.
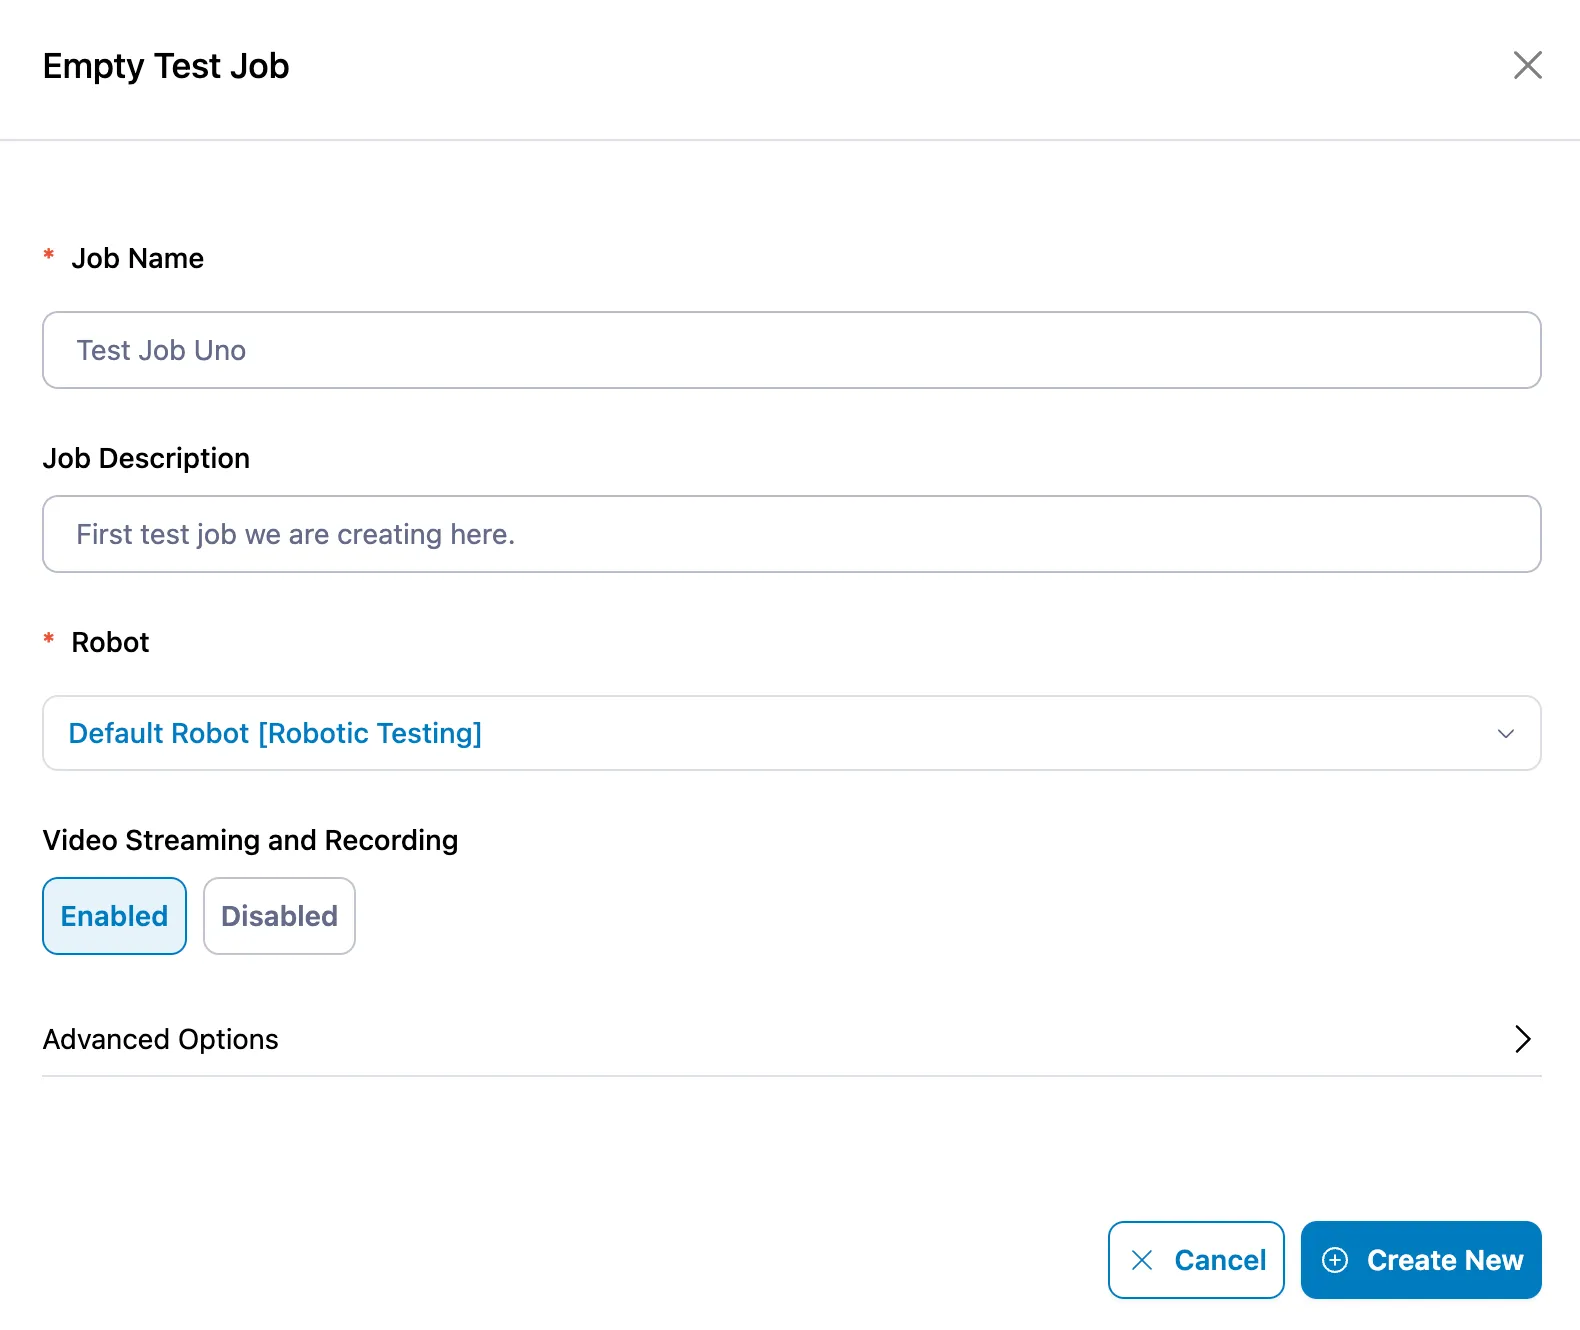
- Fill in the Job Details:
- Job Name: The name of your test job.
- Job Description: A short description of your test job.
- Robot: By default, the Default Robot is selected. You can create/select a different robot later if required, but for now, let’s keep it as is.
- Video Streaming and Recording: Enable this to see the video stream and playback. This is optional.
- Click Create New.
Congratulations! You have created your first test job. We will skip all the bells and whistles that come along with the Test Job Configuration for now, and focus on the Test Cases and Test Execution.
Step 2: Create a Test Case
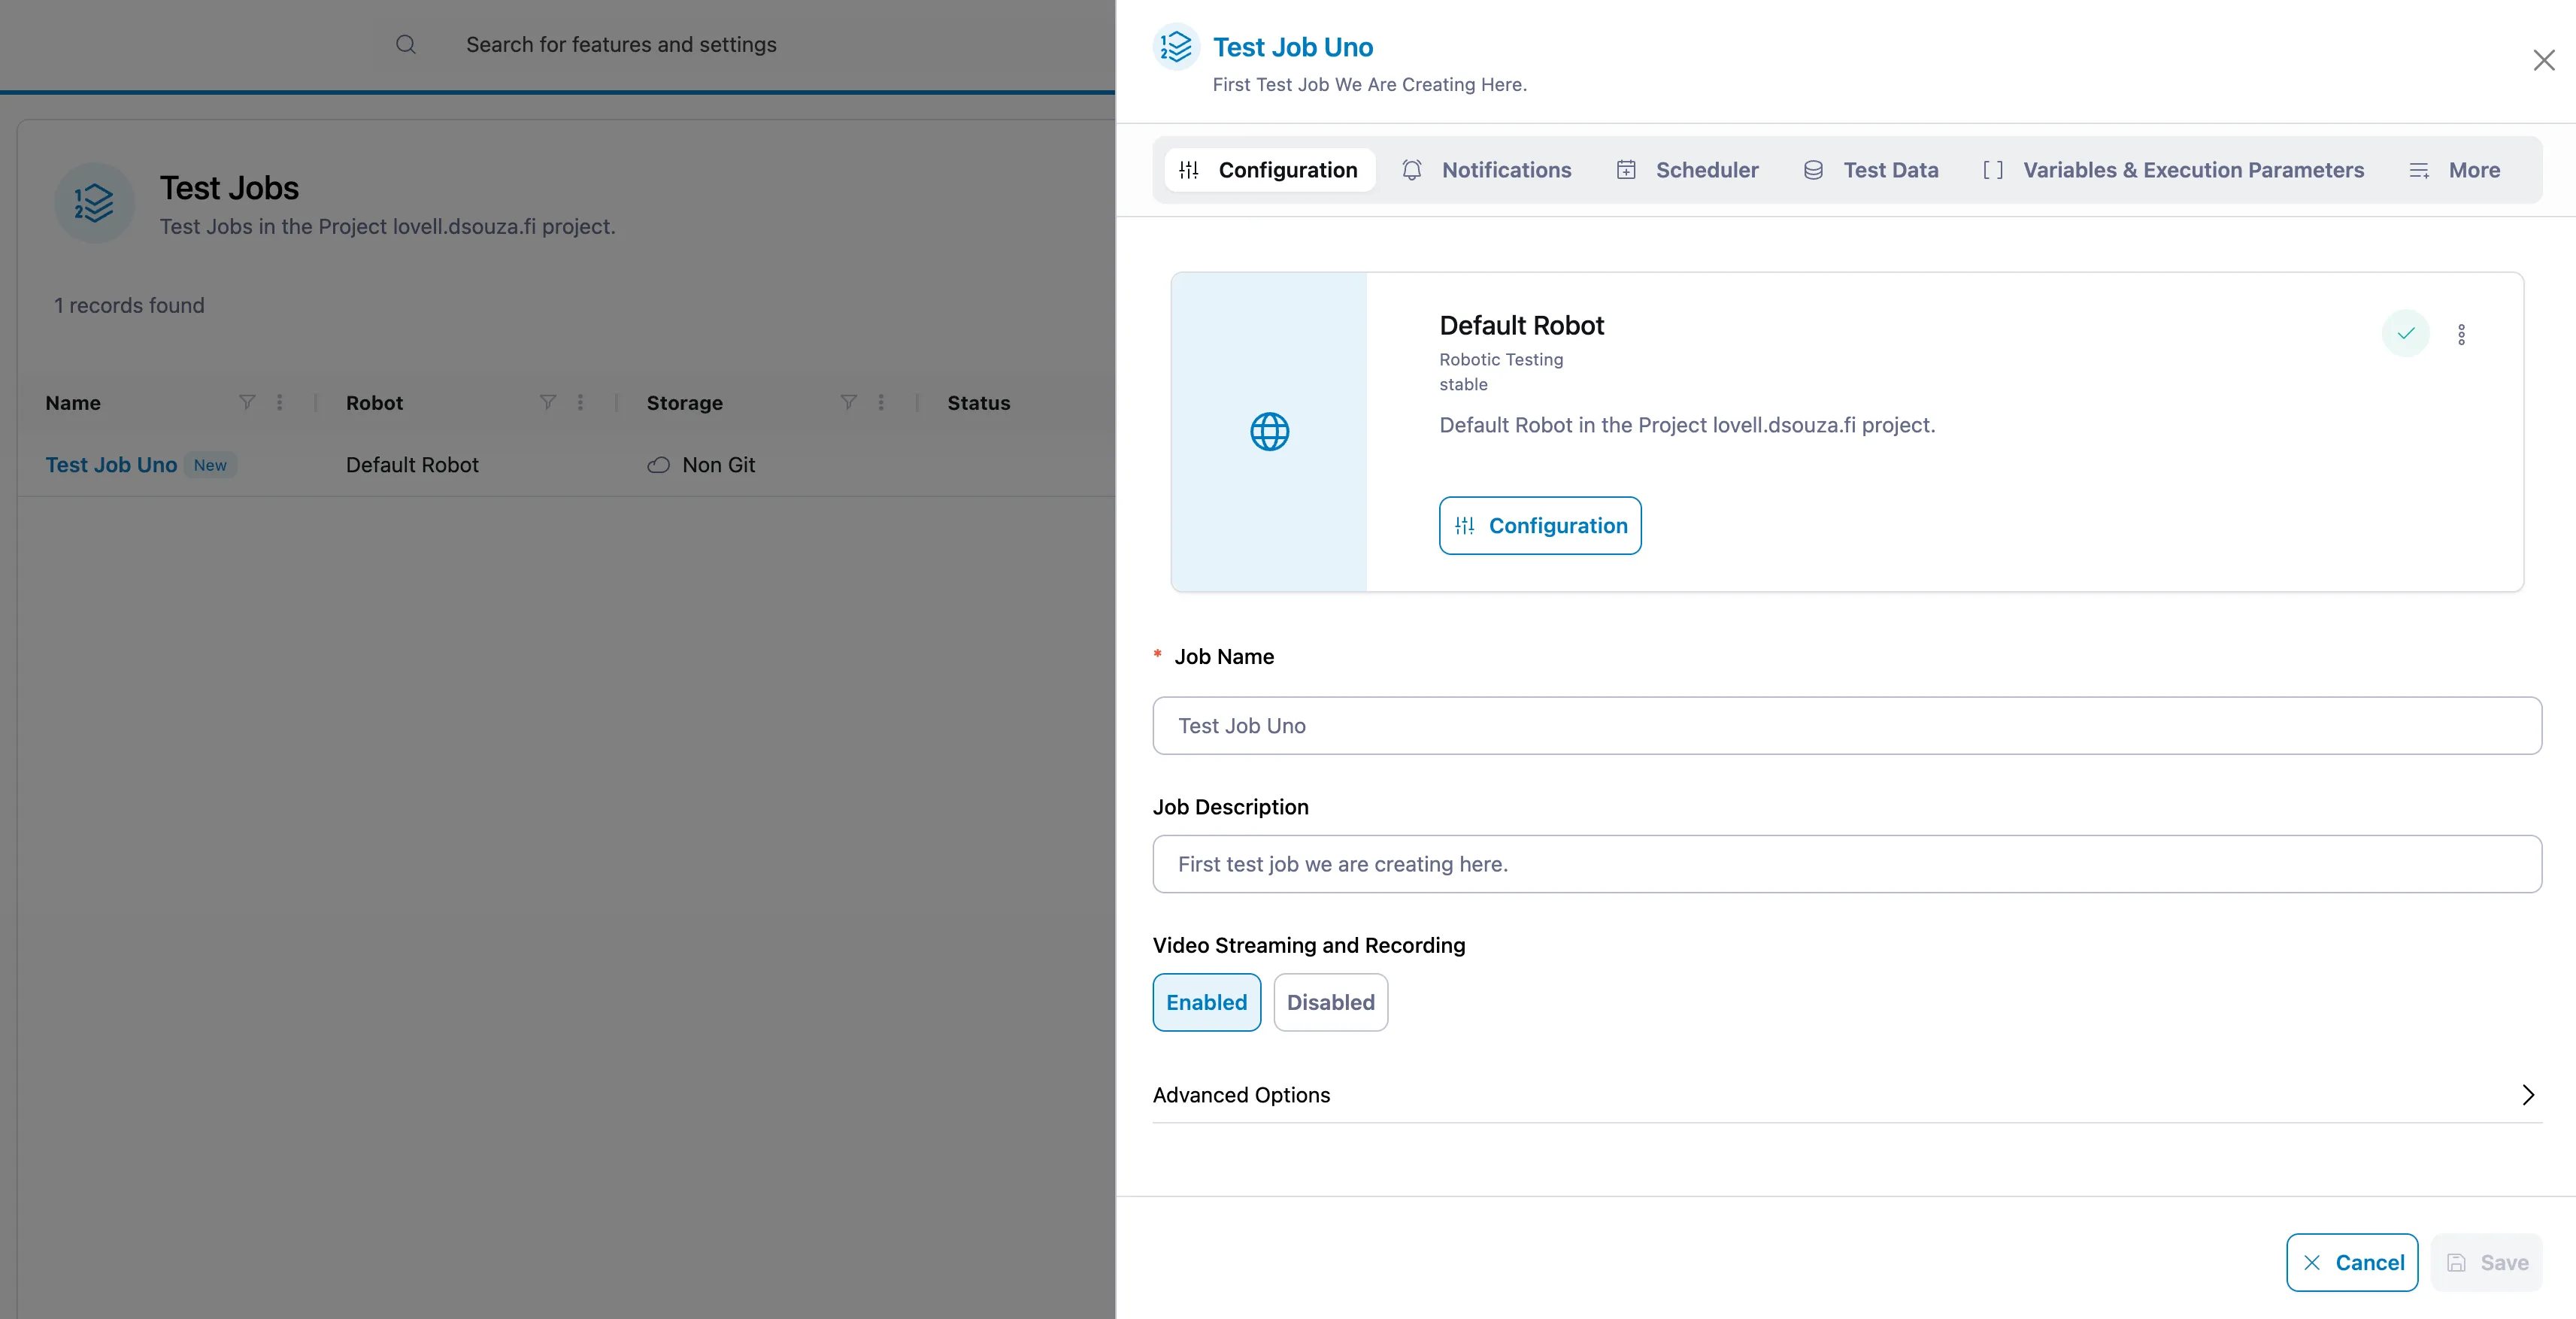
Dismiss the Test Job Configuration panel from Step 1, to see the Test Jobs list.

- Click on the QEditor button to open the QEditor. This is where you will write your test cases.
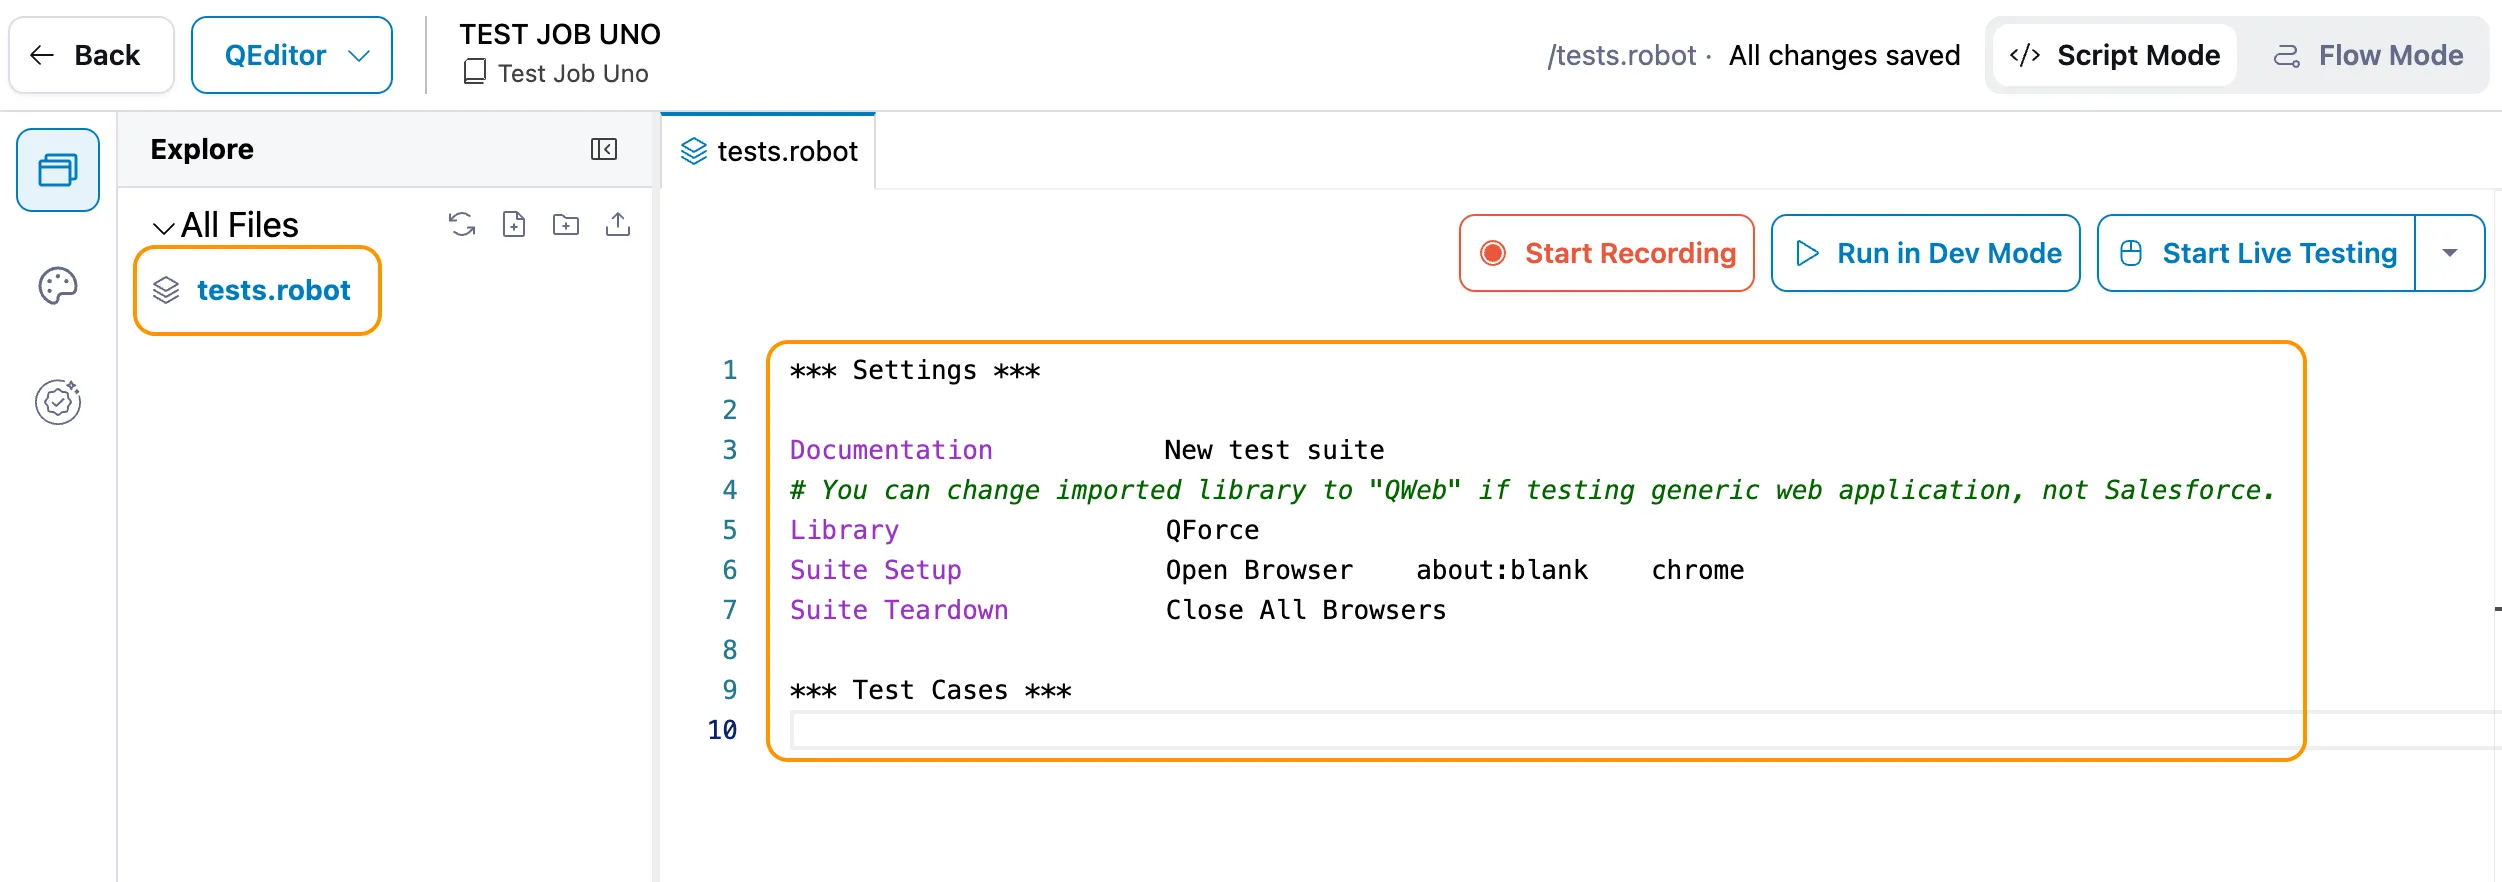
- Edit the Code:
- A tests.robot file should exist by default with some sample code.
- Replace the sample code with the code below, making sure to replace relevant parts of the code with your own.
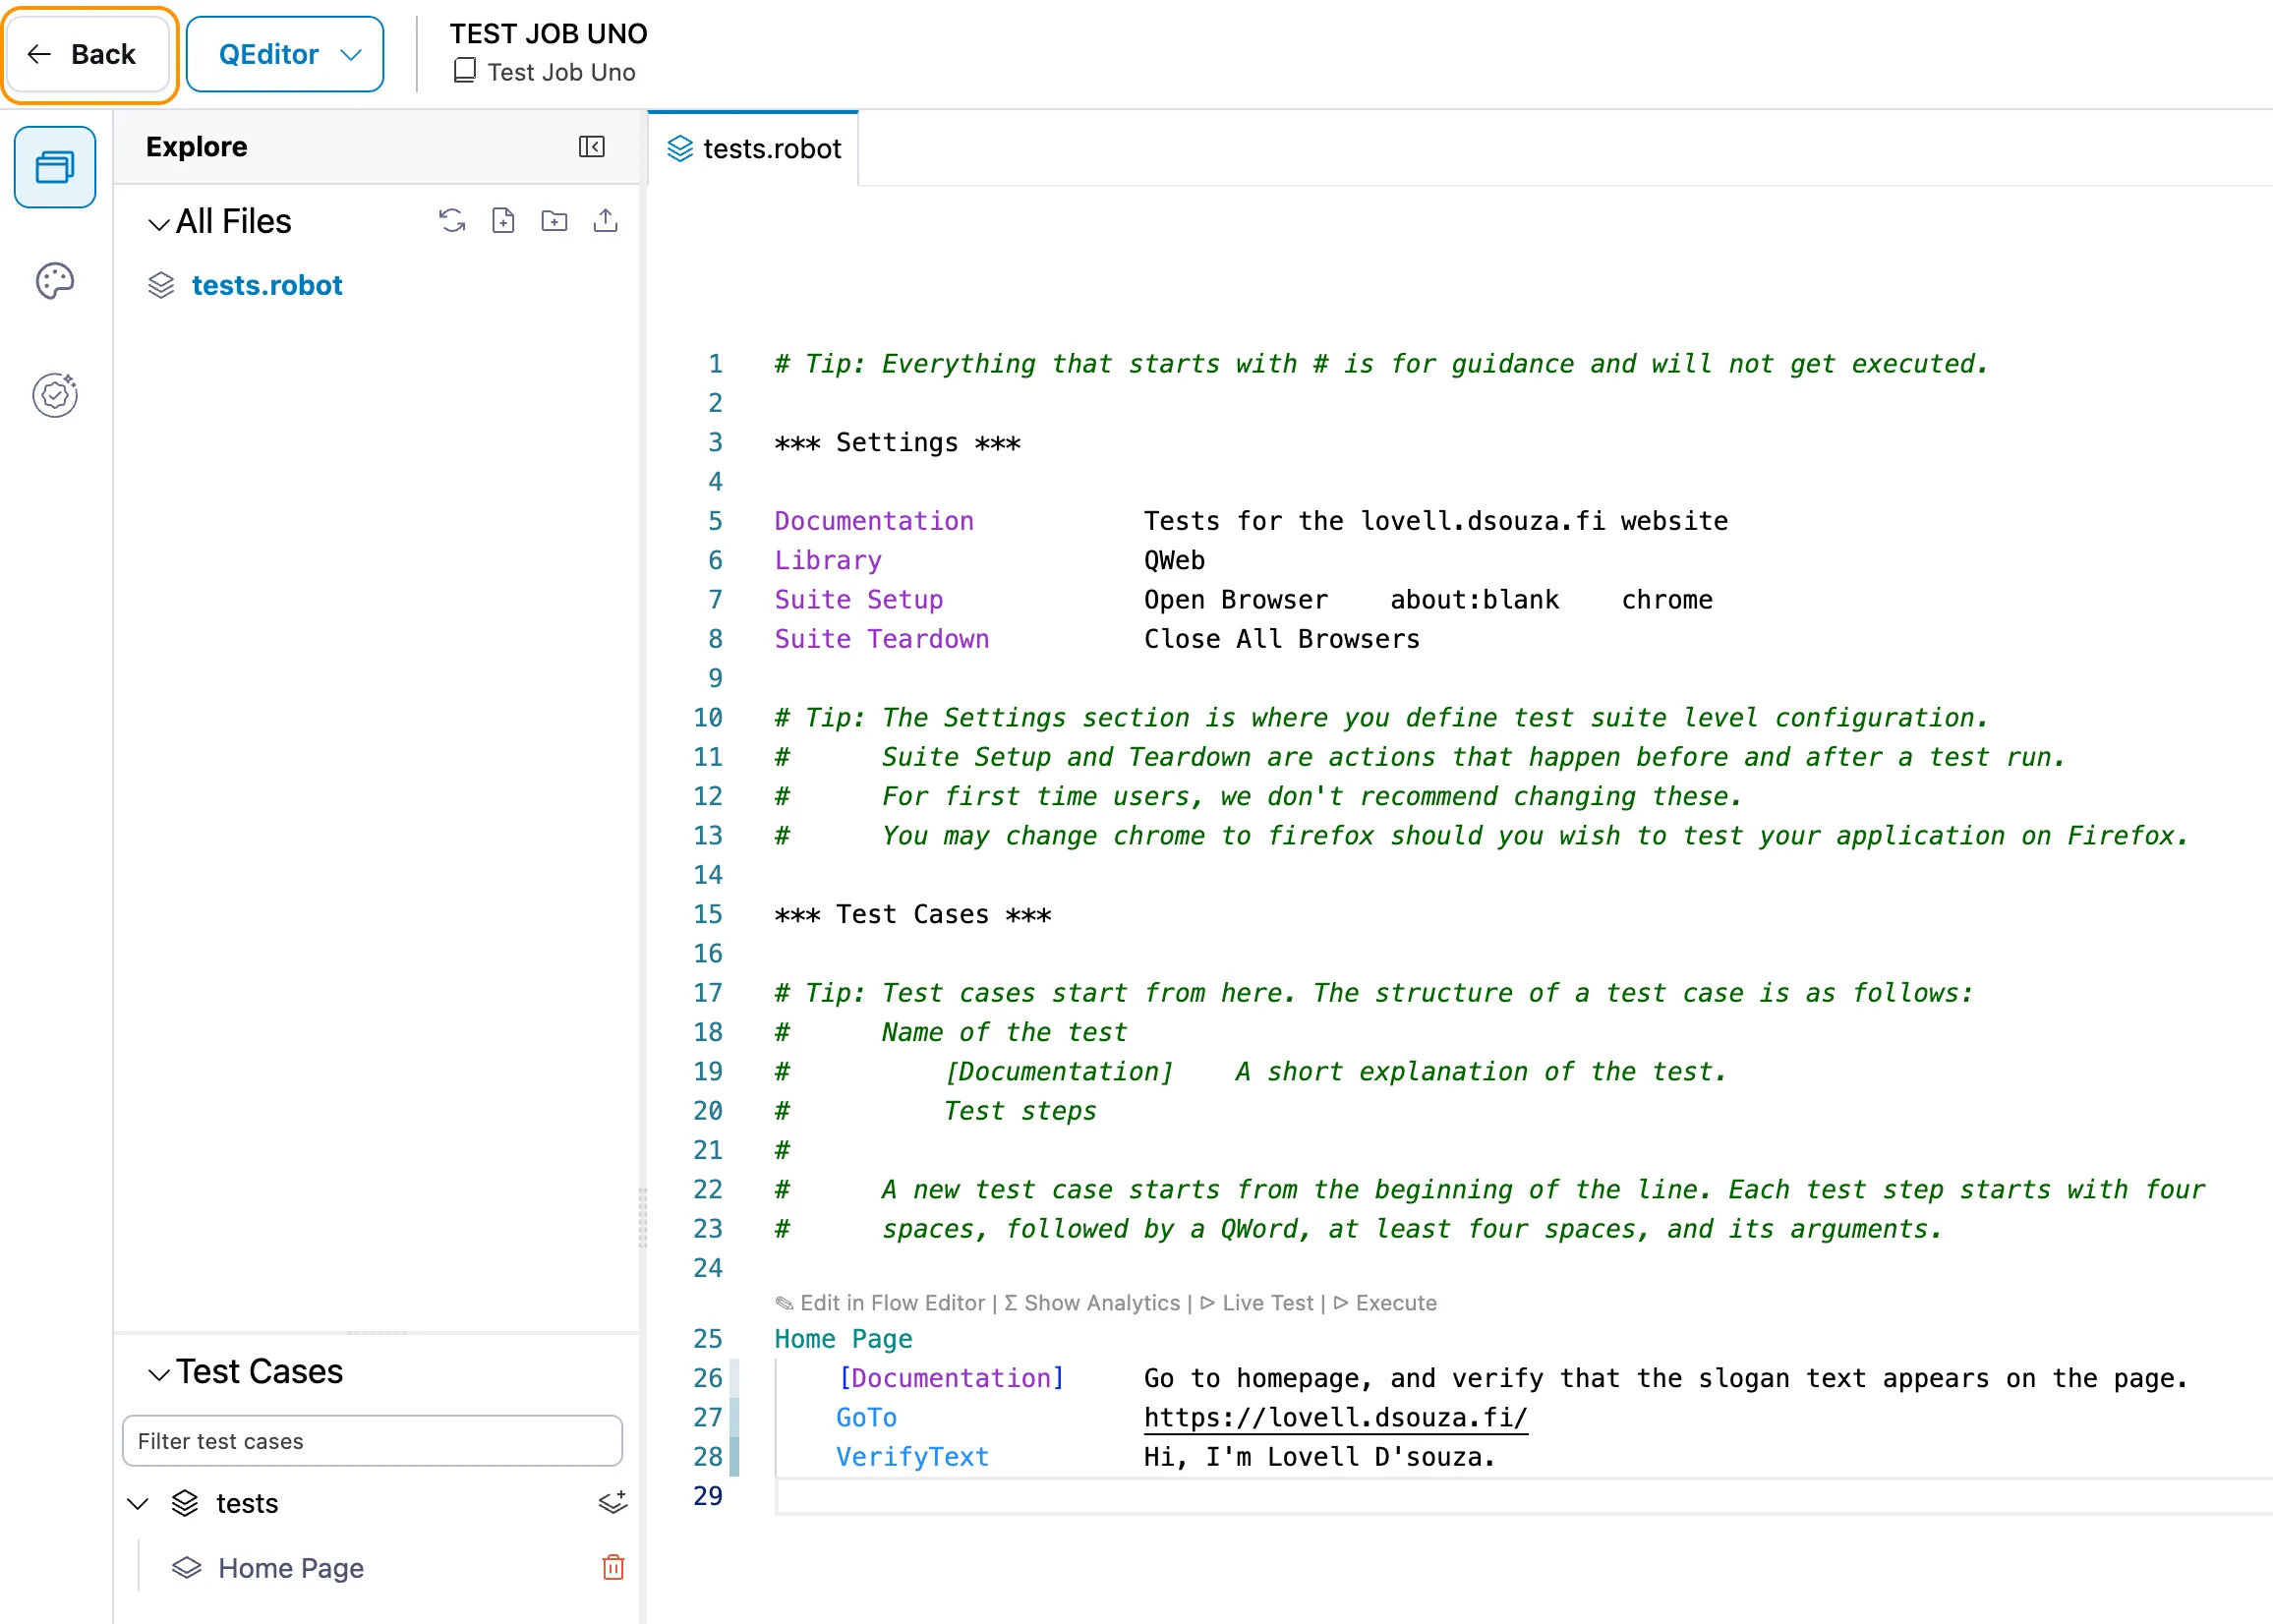
# Tip: Everything that starts with # is for guidance and will not get executed.

*** Settings ***

Documentation           Tests for the lovell.dsouza.fi website
Library                 QWeb
Suite Setup             Open Browser    about:blank    chrome
Suite Teardown          Close All Browsers

# Tip: The Settings section is where you define test suite level configuration.
#      Suite Setup and Teardown are actions that happen before and after a test run.
#      For first time users, we don't recommend changing these.
#      You may change chrome to firefox should you wish to test your application on Firefox.

*** Test Cases ***

# Tip: Test cases start from here. The structure of a test case is as follows:
#      Name of the test
#          [Documentation]    A short explanation of the test.
#          Test steps
#
#      A new test case starts from the beginning of the line. Each test step starts with four
#      spaces, followed by a QWord, at least four spaces, and its arguments.

Home Page
    [Documentation]     Go to homepage, and verify that the slogan text appears on the page.
    GoTo                https://lovell.dsouza.fi/
VerifyText Hi, I'm Lovell D'souza.- Save the file (Cmd/Ctrl + S) and then click on the Back button to go back to the Test Job view.
We are going to skip a lot of the QEditor capabitilities for now, and focus on the Test Cases and Test Execution. The QEditor will be covered in more detailed in a separate post.
Step 3: Run the Test Job
- In the Test Job view, click on the Run Test Job button the top right corner.
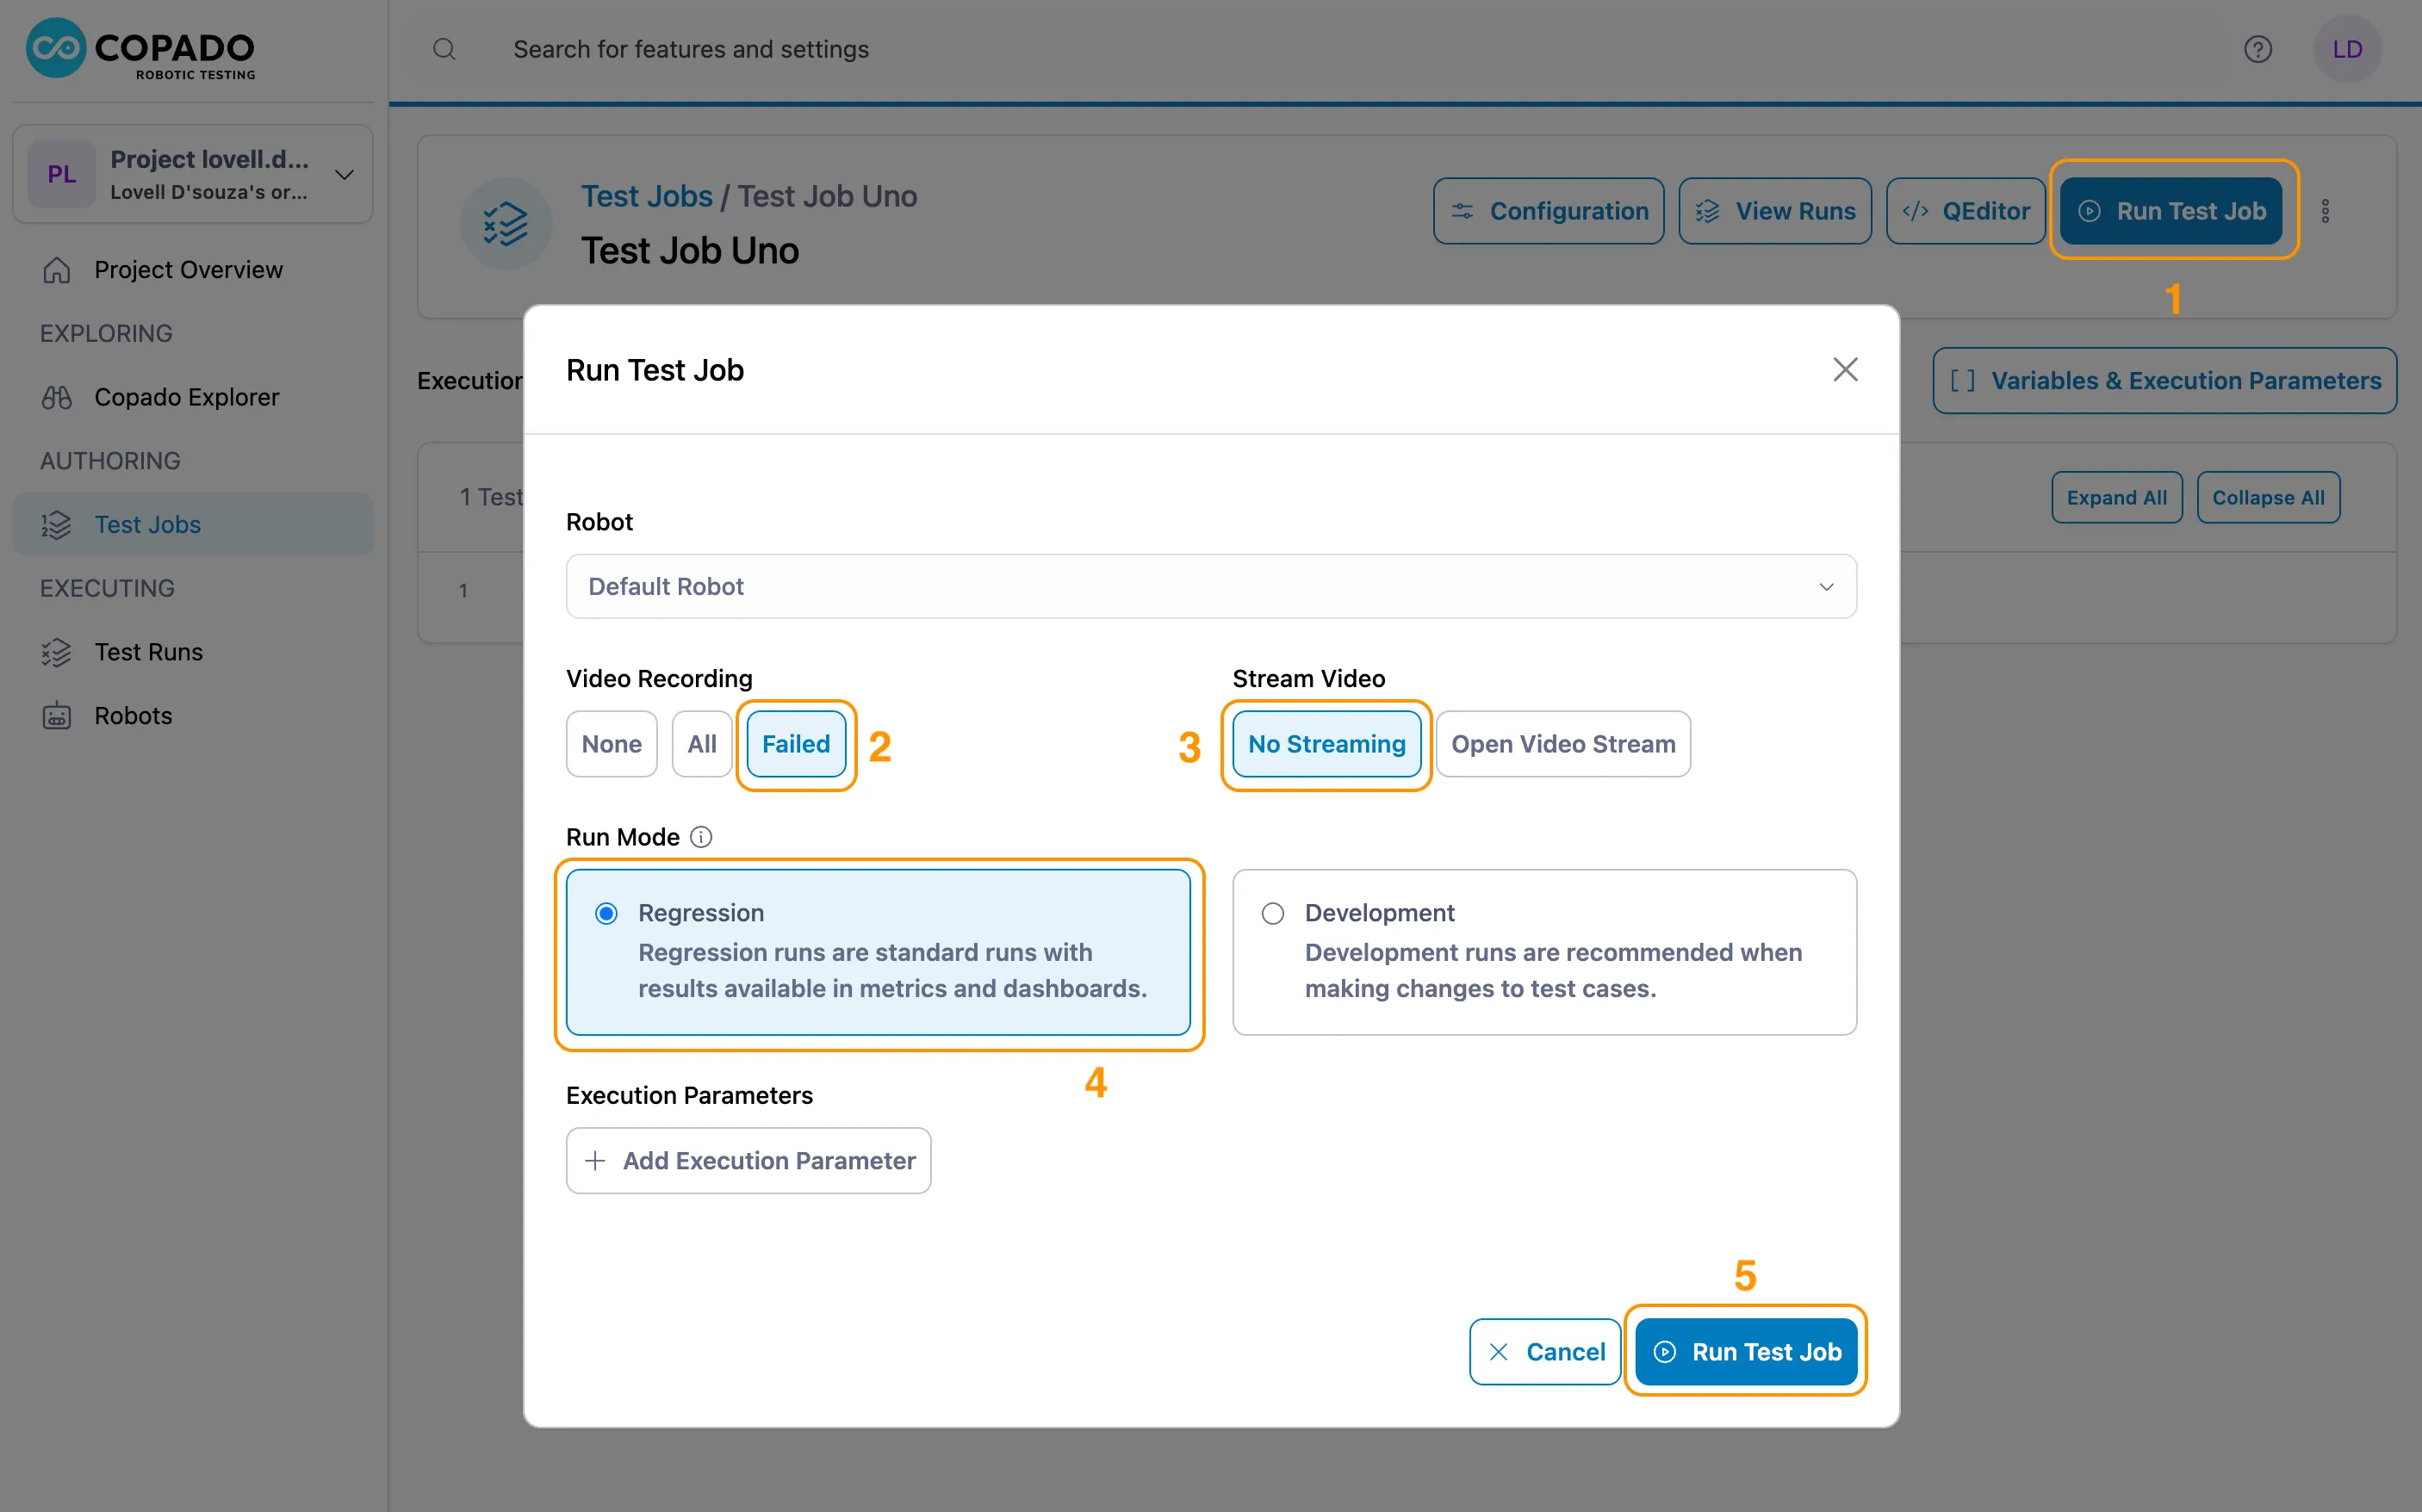
- In the Run Test Job dialog, select the following options:
- Video Recording: Failed. This lets you see the video recording of failed tests cases.
- Stream Video: No Streaming. This is fine if you want to see the testing in action, but it also slows down the test execution by a few seconds. I recommend not turning this on unless you really want to.
- Run Mode: Regression is fine.
- Click Run Test Job.
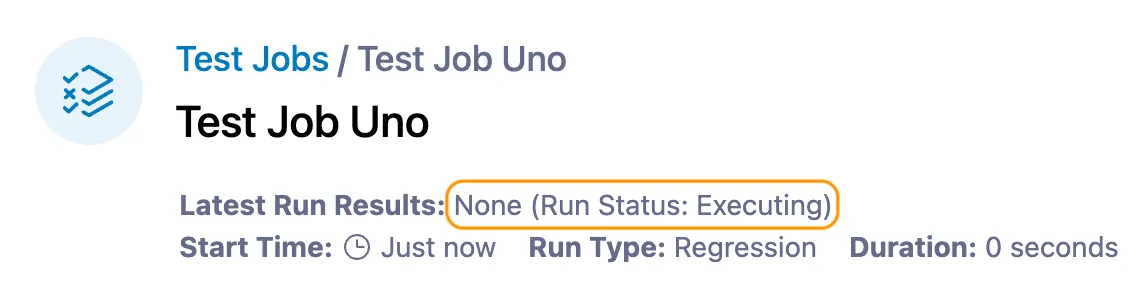
This will start the test execution and you will see the Run Status set to Executing.

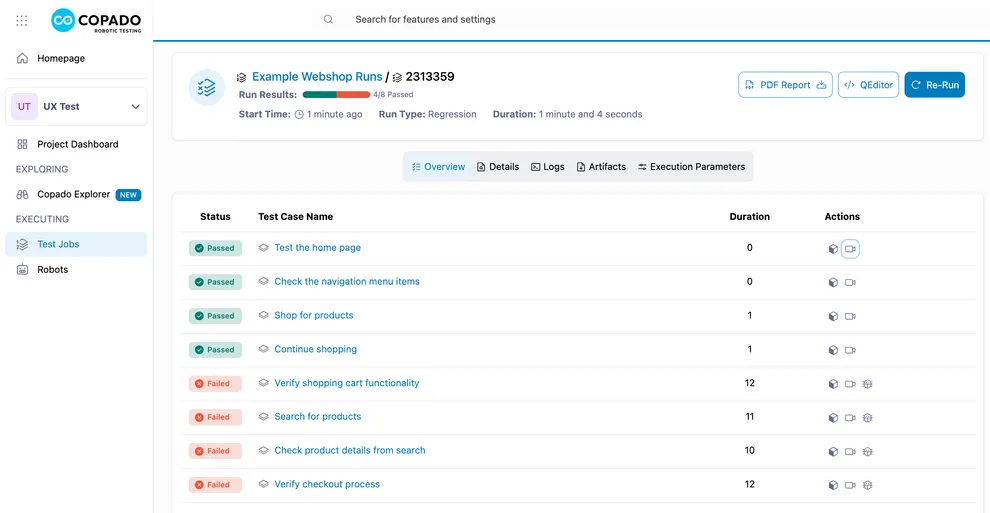
Once the test execution is complete, you will see the Run Results. Clicking this will take you to the Run Results Overview.
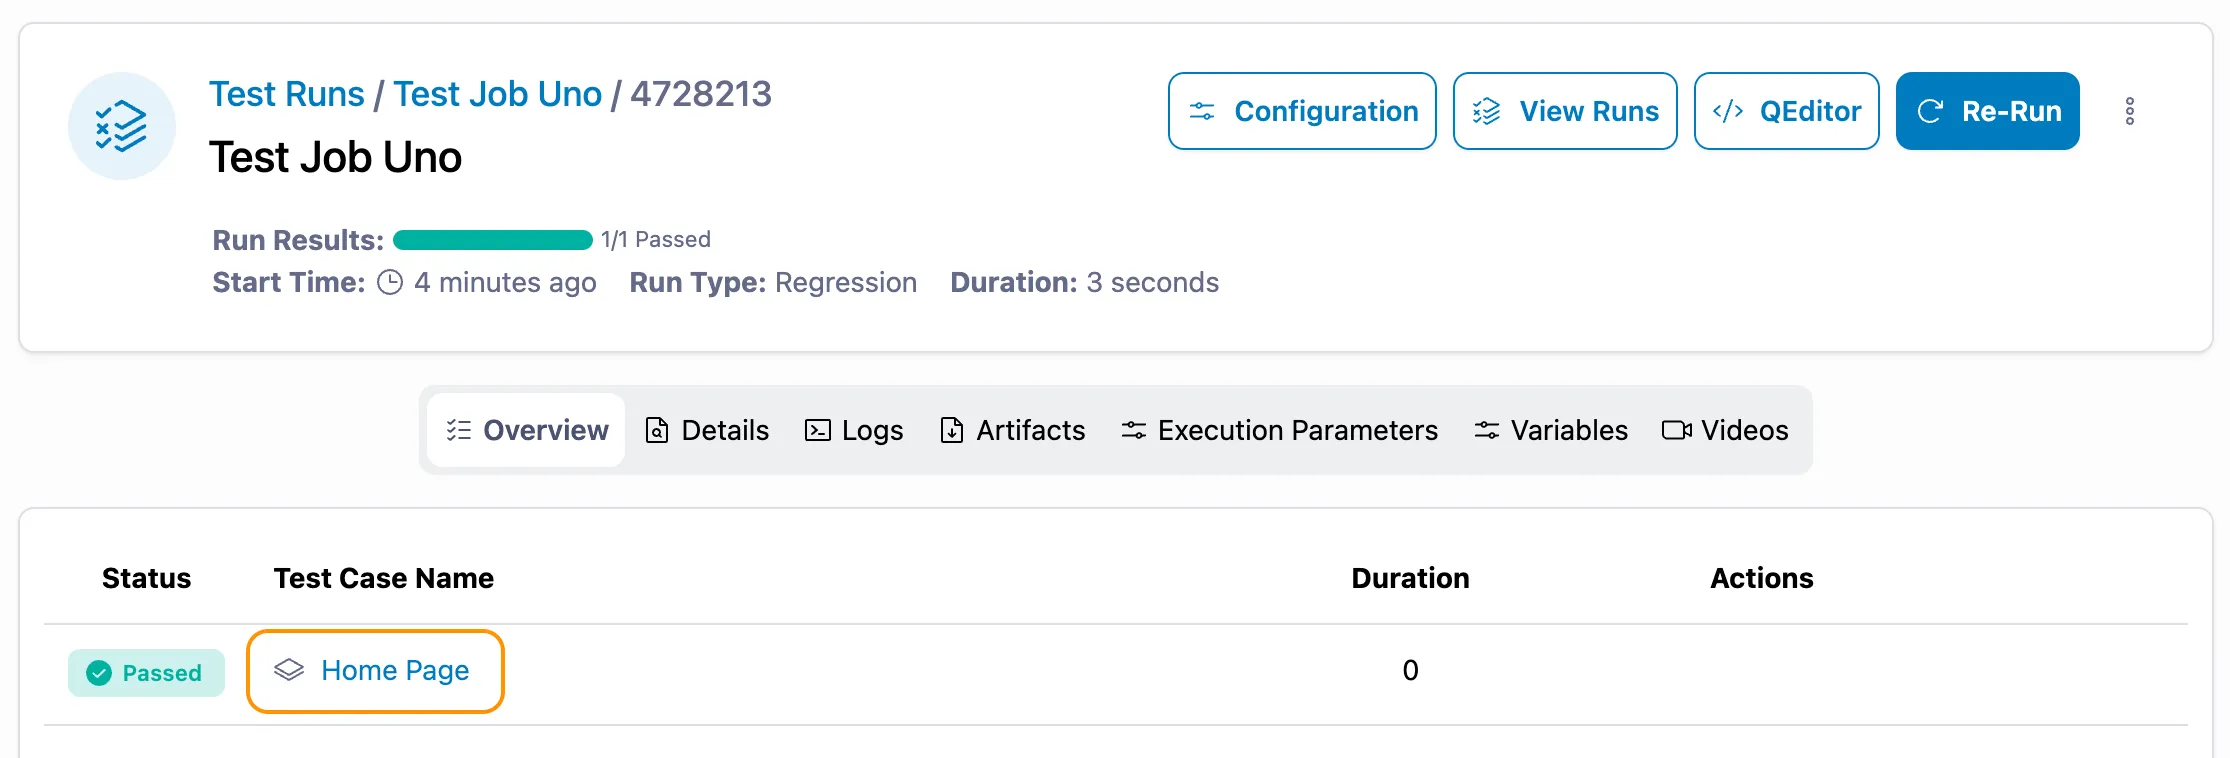
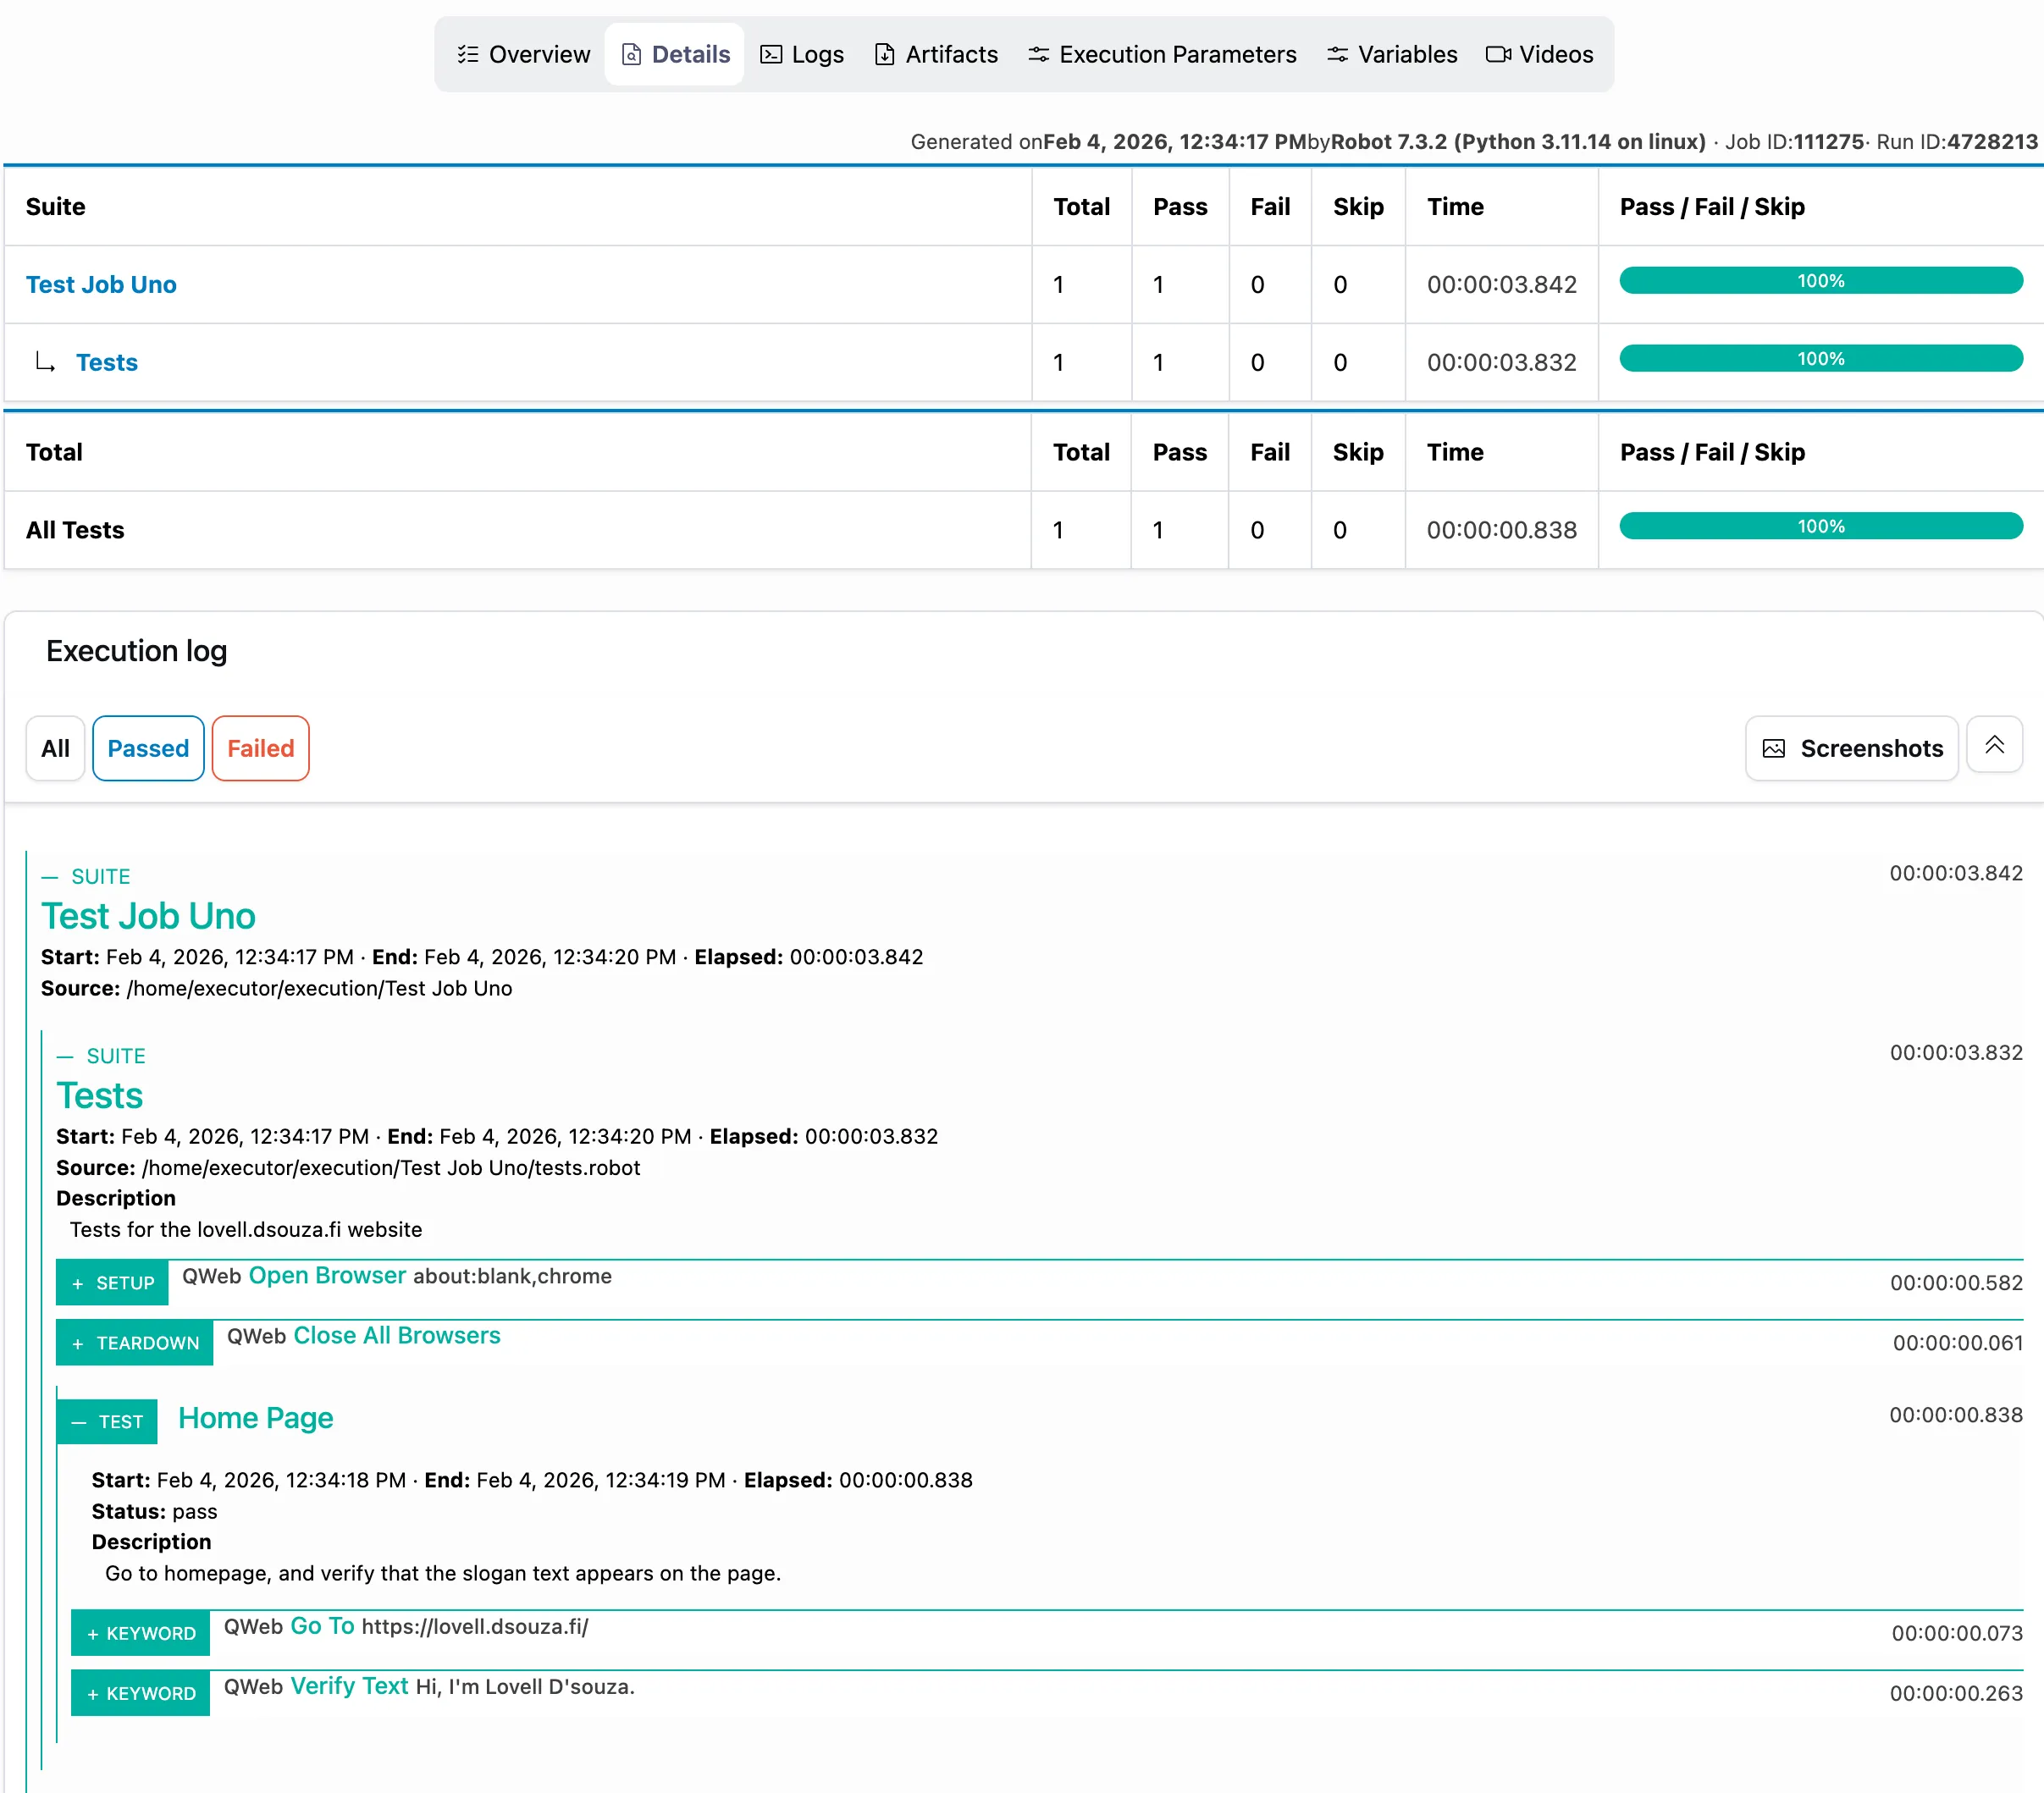
Clicking on the Test Case name will take you to that particular test case details in the Run Results Details.
Conclusion
You have now completed the basic workflow of creating a test job, creating a test case and running the test job. You can now go back to the QEditor and start creating more test cases.